Using AWS Cognito to Secure an ExpressJS API
In recent articles, I have shown how to create a login screen using AWS Cognito, and validate the resulting JSON Web Token (JWT) using Javascript. This article brings those elements together, showing how we can use our AWS Cognito login screen to protect access to an API being served from an ExpressJS application.
A Simple API
Before worrying about authentication, let’s build a simple application without authentication first. Then we can add authentication into the application, and it will be clear what is actually relevant to the authentication itself. We will create a very simple application, consisting of a web page with a button on it. When the button is clicked, an API call is made, and the result is shown in a box on the web page.
Let’s look at the API server code itself:
const express = require("express"),
      app = express(),
      port = 3000;

// Serve static files from folder called public
app.use("/app", express.static("static"));

// Respond to a an API request
app.get("/", (request, response) => {
    response.setHeader('Content-Type', 'application/json');
    response.send({message: "Hello friend"});
});

// Start the server
app.listen(port, () => console.log("Server listening on port " + port));
As you can see, it is a pretty standard ExpressJS application, which responds
to a GET with a simple message, and also sets up a directory (called static)
where we can put any additional files we want to serve. Those files will
appear under the path /app in the URL.
In the static directory, we will put our web page, which looks like this:
<!doctype html>
<html class="no-js" lang="">
    <head>
        <meta charset="utf-8">
        <meta http-equiv="X-UA-Compatible" content="IE=edge">
        <title>Cognito User Pool Example</title>
        <meta name="description" content="Cognito User Pool Example">
        <meta name="viewport" content="width=device-width, initial-scale=1">
        <link rel="stylesheet" href="https://cdn.rawgit.com/Chalarangelo/mini.css/v3.0.0/dist/mini-dark.min.css">
        <script src="api-call.js" type="text/javascript" charset="utf-8"></script>
    </head>
    <body>
        <header>
            <span class="logo">Cognito User Pool Example</span>
            <button onclick="apiCall()">Make an API Call</button>
        </header>
        <p>Status: <mark id="status">Undefined</mark></p>
        <p>Result</p>
        <pre id="result">/* No API call made */</pre>
    </body>
</html>
As you can see, this web page is also very simple. I have included Mini
CSS for a bit of lightweight styling, and I have created
a Javascript file called api-call.js which will contain the action logic
(e.g. making the API calls). The body of the page has a title and a button to
click. An area for the result, and also somewhere to show the result status of
the API call. When the button is clicked, it will call the function
apiCall() (which will be defined in api-call.js, and I have put IDs on the
tags for the result area and the status area so I can update them from
Javascript.
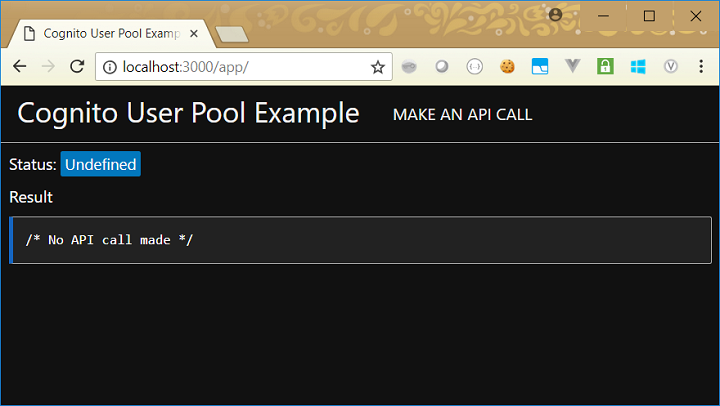
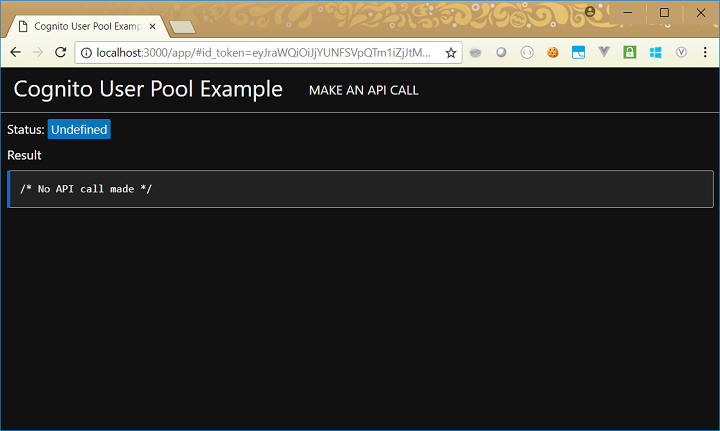
This gives us a web page which looks like this:
The only file remaining to look at is api-call.js:
// Prettify a JSON payload
const prettify = (x) => JSON.stringify(JSON.parse(x), null, 4);

// Prepare our API call in advance
const xhr = new XMLHttpRequest();

// Set up our handler for the API call completing
xhr.onreadystatechange = function () {

    // When our state is 4, we have completed the API call
    if (this.readyState == 4) {

        // Update our status marker
        document.getElementById("status").innerHTML = "" + this.status;

        // On success, display the result
        if (this.status == 200) {
            document.getElementById("status").className = "tertiary";
            document.getElementById("result").innerText = prettify(xhr.responseText);

        // On failure, indicate the fail
        } else {
            document.getElementById("status").className = "secondary";
            document.getElementById("result").innerHTML = "/* Unsuccessful API call */";
        }
    }
};

// Function to call the api
function apiCall () {
    xhr.open("GET", window.location.origin + "/", true);
    xhr.send();
}
This is very basic functionality, but it allows us to make an API call and
display the result. The code should be understandable from the comments, but
the key point to note is that when we get our result from the API call, we
check the status. If it is successful (status code 200), we set the colour of
the status marker to indicate success (tertiary is a green colour in
mini.css), and display a prettified version of the result in our result area:
if (this.status == 200) {
    document.getElementById("status").className = "tertiary";
    document.getElementById("result").innerText = prettify(xhr.responseText);
A successful API call therefore looks like this:

If, however, we get an error (which we are assuming is any other status code
— which I know is not strictly correct), we set the colour of the status
marker to red (secondary in mini.css) and put a message in the result area
to indicate the call failed:
} else {
    document.getElementById("status").className = "secondary";
    document.getElementById("result").innerHTML = "/* Unsuccessful API call */";
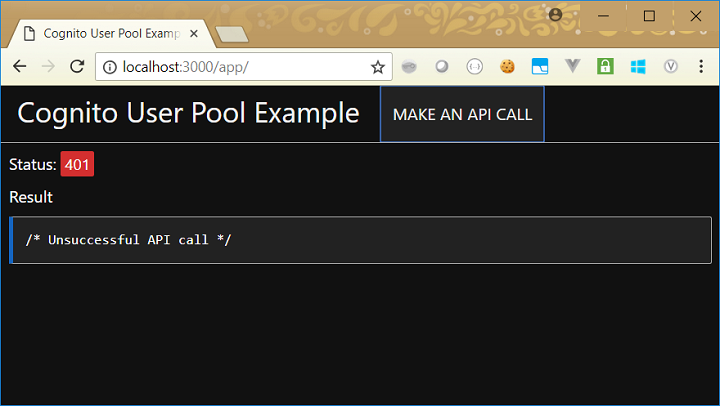
A failed API call will look like this:

Now we have a simple app, let’s look at how to add in authentication using AWS Cognito.
Adding Authentication to the Server
Let’s start by considering our ExpressJS server side application, and how we will add validation to that. The first thing we need to do, is include our validation module from the earlier article:
const validate = require("./validate");
Since there are a number of ways in which validation can fail, it will also be
useful to have a small utility function, which can send a standard
authorisation error response (i.e. an HTTP 401 response). In addition to
sending a not authenticated response, we can also add any other useful
information. In my case, I’m including the URL of the authentication server,
and any additional details we may have:
// Utility function to send a 401 response
function send401 (response, err) {
    response.status(401).send({
        error: "Not authenticated",
        idp: "/* Cognito auth URL goes here */",
        detail: err.message
    });
}
For brevity, I have put in a placeholder comment for the Identity Provider. In reality, it should be the URL for your Cognito login page. Mine looks like this:
https://blog-example.auth.us-east-1.amazoncognito.com/login
    ?response_type=token
    &client_id=2n4mbdugkkjoi3fchf0tlq0t33
    &redirect_uri=http://localhost:3000/app
Note also that for this to work, you need to make sure that
http://localhost:3000/app is entered as a callback URL in your AWS
Cognito app client settings:

We can use localhost while we are developing, but will need to replace with a
real URL once we want to go live. Note also that AWS Cognito allows us to
use an http URL for localhost, but any other URL will need to be https.
We now get onto the main part of the authentication — the function which checks the user’s JWT. We use the middleware pattern from ExpressJS, which allows us to define a function which gets called on every request.
The standard way to pass a JWT to an API call, is to add an Authorization
header to the API request, which contains the word bearer followed by the JWT
itself. So, our authentication function needs to do the following:
- Check that an
Authorizationheader has been passed - Check that it is in the expected
bearerformat - Extract the JWT from the header
- Call our validation module to check that the JWT is correct
- If everything is okay, use the middleware
next()function to allow the request to be processed
If any of the above steps fail, we want to return a suitable error (using our
send401() function) and exit.
Here is the code to achieve that:
// Authentication / authorisation middleware
app.use((request, response, next) => {

    response.setHeader('Content-Type', 'application/json');

    // We need an authorization header
    if (!request.headers || !request.headers.authorization) {
        send401(response, new Error("Missing authorization header"));

    // We need the authorization header to be a "bearer" header
    } else if (request.headers.authorization.substr(0, 7).toLowerCase() !== "bearer ") {
        send401(response, new Error("Authorization header is not a bearer header"));

    // So, we've got a token, which we validate.  If the validation is
    // successful, we send the requested response.  If the validation fails,
    // we send a 401 response (which includes the error from the validation).
    } else {
        validate(request.headers.authorization.substr(7),
                 (success) => { next(); },
                 (fail) => { send401(response, fail); });
    }
});
Finally, our GET handler is the same as before:
// Respond to a an API request
app.get("/", (request, response) => {
    response.send({message: "Hello friend"});
});
Now we can test this out, by firing up our server and using curl to try
various scenarios. First, let’s just try a simple request:
curl http://localhost:3000/
This is what we get back as a response:
HTTP/1.1 401 Unauthorized
X-Powered-By: Express
Content-Type: application/json; charset=utf-8
Content-Length: 96

{
  "error": "Not authenticated",
  "idp": "/* Cognito auth URL goes here */",
  "detail": "Missing authorization header"
}
This is the expected response — the user is unable to access the data because
no authorisation information has been provided at all. So, let’s add a header
with the name Authorization:
curl -H "Authorization: foo" http://localhost:3000/
Here is the response we get for that:
HTTP/1.1 401 Unauthorized
X-Powered-By: Express
Content-Type: application/json; charset=utf-8
Content-Length: 111

{
  "error": "Not authenticated",
  "idp": "/* Cognito auth  URL goes here */",
  "detail": "Authorization header is not a bearer header"
}
Again, this is a sensible response. Although an Authorization header has
been provided, it is not in the expected format. So let’s now add in the
bearer keyword:
curl -H "Authorization: bearer foo" http://localhost:3000/
Here is the response from that:
HTTP/1.1 401 Unauthorized
X-Powered-By: Express
Content-Type: application/json; charset=utf-8
Content-Length: 90

{
  "error": "Not authenticated",
  "idp": "/* Cognito auth  URL goes here */",
  "detail": "Unable to decode token"
}
Because foo is not a valid JWT, we get a response that says it could not be
decoded. So, let’s pass in a valid token from our Cognito user
pool login screen (truncated to save space here):
curl -H "Authorization: bearer eyJraWQiOiIy...kEXXq10rqDakMoog" http://localhost:3000/
This shows the content we are interested in:
HTTP/1.1 200 OK
X-Powered-By: Express
Content-Type: application/json; charset=utf-8
Content-Length: 26

{
  "message": "Hello friend"
}
Let’s also try a couple of valid JWTs which have problems with them. Here is a JWT from a completely unrelated login screen:
curl -H "Authorization: bearer eyJraWQiOiJ1...-Qd2mSUuGlF_Ou3w" http://localhost:3000/
Which gives this response:
HTTP/1.1 401 Unauthorized
X-Powered-By: Express
Content-Type: application/json; charset=utf-8
Content-Length: 105

{
  "error": "Not authenticated",
  "idp": "/* Cognito auth  URL goes here */",
  "detail": "secret or public key must be provided"
}
This is a reassuring response — it shows that you cannot login by using a token from a different login process.
Now let’s try passing in a JWT from the correct login screen, but one we got a few days ago:
curl -H "Authorization: bearer eyJraWQiOiIy...7KWmB-py28287yWw" http://localhost:3000/
Here is the response for that:
HTTP/1.1 401 Unauthorized
X-Powered-By: Express
Content-Type: application/json; charset=utf-8
Content-Length: 79

{
  "error": "Not authenticated",
  "idp": "/* Cognito auth  URL goes here */",
  "detail": "jwt expired"
}
This is also a good response — it shows that the time limit on validity is being honoured.
Finally, let’s try using our web page we built earlier. Here is what we see there:
So, we can see that our web page correctly prevents access (and shows the 401 error code). However, it is not very useful (i.e. it doesn’t allow us to login and authorise). So our next step is to modify this web page, so that it takes us to the login screen when it detects this error, then passes the JWT into the API call it makes.
Adding Authentication to the Client Application
The first change we need to make to our client side application, is to send the user to the login page (our Cognito page), if the server tells us we are not authorised to access a resource.
If you recall from our original code, we treat all errors in the same way:
// On success, display the result
if (this.status == 200) {
    document.getElementById("status").className = "tertiary";
    document.getElementById("result").innerText = prettify(xhr.responseText);

// On failure, indicate the fail
} else {
    document.getElementById("status").className = "secondary";
    document.getElementById("result").innerHTML = "/* Unsuccessful API call */";
}
The change we need to make, is to handle a 401 response specially. We check
the response and look for the idp field in it, then take the user to that
page using a window location redirect. If something goes wrong we the
redirection, we just display an error message instead:
// On success, display the result
if (this.status == 200) {
    document.getElementById("status").className = "tertiary";
    document.getElementById("result").innerText = prettify(xhr.responseText);

// On authorization failure, redirect to authentication server
} else if (this.status == 401) {
    if (xhr.responseText) {
        const response = JSON.parse(xhr.responseText);
        if (response.idp) {
            window.location = response.idp;
            return;
        }
    }

    // If we have no specifics around the failure, provide a generic message
    document.getElementById("status").className = "secondary";
    document.getElementById("result").innerHTML = "/* Not authorised for access */";

// On failure, indicate the fail
} else {
    document.getElementById("status").className = "secondary";
    document.getElementById("result").innerHTML = "/* Unsuccessful API call */";
}
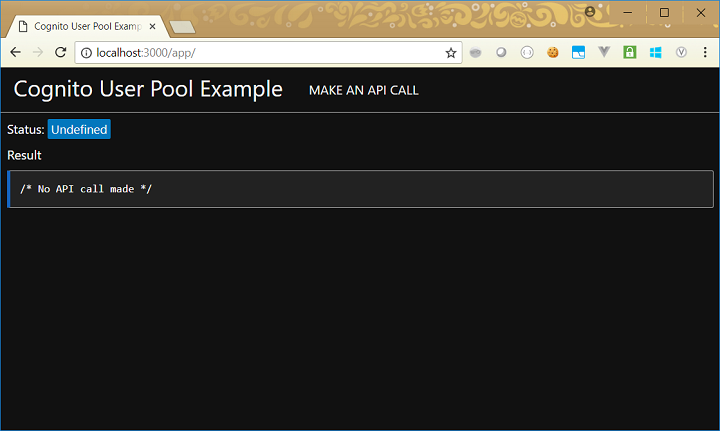
Let’s see what this does to our web page. If we load up the page, it start off the same as before:
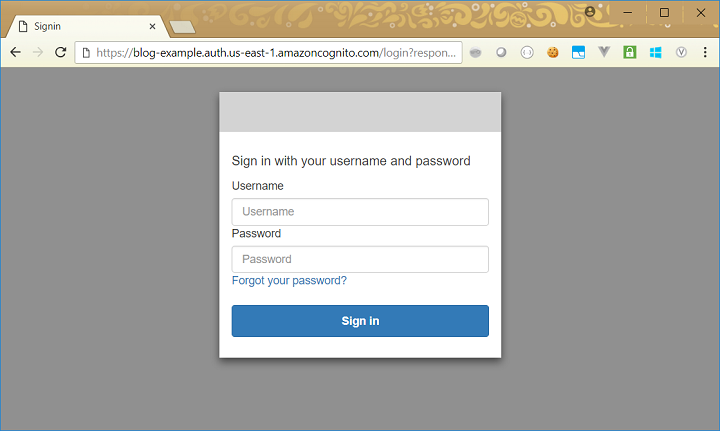
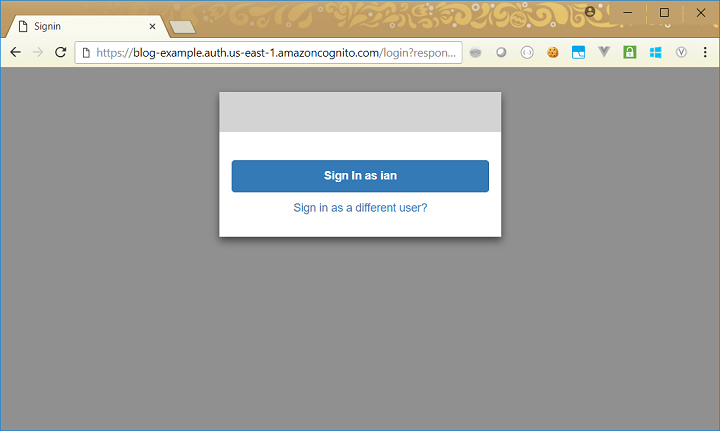
If we click on the Make an API Call button, we see a change in the behaviour. We temporarily see the authorization error as before, but then we are redirected to our Cognito login page:
If we enter valid login credentials, we get taken back to our web app, but this time we now have an access token, which you can see in the URL:
However, if you click on the Make an API Call button, you are then taken back to the Cognito login page:
We now have half our functionality (allowing the user to log in), but we don’t do anything with the user’s token after login. So what we need to do next, is make use of the access JWT from the URL when we make an API call.
Because the access token is passed to us from Cognito in the URL, we need to do the following:
- Extract the Cognito values from the URL
- Find the
access_tokenin the Cognito values - Insert the
access_tokeninto anAuthorization bearerheader
First, we’ll create a function which takes an array of values, and finds the
access_token in them. We’ll write it so that it can be called from a
reduce() function:
// Find the access token in an array of elements
function findAccessToken(result, current) {
    if (current.substr(0, 13) === "access_token=") {
        return current.substr(13);
    }
    return result;
}
The access_token is in the hash part of the URL, so we can find that,
convert it into an array, and then apply reduce() with the function we’ve
just written:
const jwt = window.location.hash.split("&").reduce(findAccessToken);
Finally, we can add that jwt value to a header in our request:
xhr.setRequestHeader("Authorization", "bearer " + jwt);
Putting that all together, our earlier apiCall() function now becomes:
// Function to call the api
function apiCall () {
    const jwt = window.location.hash.split("&").reduce(findAccessToken);
    xhr.open("GET", window.location.origin + "/", true);
    xhr.setRequestHeader("Authorization", "bearer " + jwt);
    xhr.send();
}
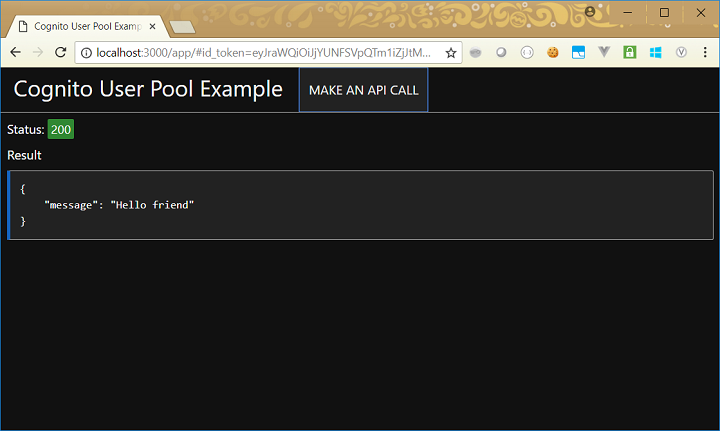
With this additional code in place, if we repeat the steps we did earlier, once we have completed the login screen, we now successfully complete our API call:
Summary
Over the past few articles, we have built up a login and authorisation system, leveraging a cloud-based identity provider and an ExpressJS application hosted elsewhere. Furthermore, we have an approach which allows single sign-on across multiple systems (for example, we could have multiple ExpressJS applications and one login screen can grant access to all of them). We could build further on this, adding in role-based authentication, additional login management activities, local caching of the JWT, etc. But we have created enough in these articles to illustrate all the necessary principles.