Very Light Javascript
I recently needed to put together a quick proof of concept for a small project and decided to use this as an opportunity to try out a lighter than light approach to Javascript I’d been thinking of for a while.
Whilst frameworks like Bootstrap are already quite light, I wanted to see if I could remove even more. With all the Angular 2 kerfuffle, I wanted to look for another framework which I can use instead. I also wanted to drop gulp and just try using npm instead.
Vue.js
I decided to use Vue.js as my Angular replacement. It is also a two way binding framework and you will see in the examples later that it looks very similar to Angular. What you don’t get with it is all the additional parts of the framework like dependency injection and web calls ($http). You therefore need to find ways of including them.
This leads to the usual framework vs library discussions. Angular gives you a specific way of achieving your outcomes (could be better for a large team of differing abilities) whereas Vue.js is more “mix and match” (may be better for a small rockstar team).
I started my Vue.js project by creating an outline ViewModel:
/*global Vue */
(function () {
    "use strict";
    var computed, data, methods;

    data = {
    };

    methods = {
    };

    computed = {
    };

    return new Vue({
        el: "body",
        data: data,
        methods: methods,
        computed: computed
    });
}());
As you can see, we need to create a new Vue instance which has the following fields:
- el — a CSS specifier for the element where Vue.js output will be displayed (think of ng-app in Angular)
- data — variables which can be referenced in the View (think of $scope in Angular)
- methods — functions which can be referenced in the View
- computed — a function which can be referenced in the View but as a variable rather than a function
For convenience, I have separated out data, methods and computed into their own variables and wrapped the whole thing in a module pattern, but that is not necessary.
I am building a web app which can display Spring Webflow XML files, so the first thing I need to do is allow the user to choose an XML file to display. I will use a (Bootstrap) dropdown to achieve this:

The fragment of HTML we need to render this is as follows:
<h4>Journey: {_{ flow.label }}</h4>
<div class="dropdown">
    <button class="btn btn-default dropdown-toggle" type="button" id="dropdownMenu1"
            data-toggle="dropdown" aria-haspopup="true" aria-expanded="true">
        Please Select
        <span class="caret"></span>
    </button>
    <ul class="dropdown-menu" aria-labelledby="dropdownMenu1">
        <li v-for="item in availableFlows">
            <a href="#" v-on:click.prevent="selectFlow(item)">{_{ item["label"] }}</a>
        </li>
    </ul>
</div> <!-- /.dropdown -->
As you can see, to use variables (from the earlier mentioned data object) we wrap them with double curly braces - as with mustache or handlebars or Angular. So at the top, you can see the journey name is displayed from the label field of the flow object.
You will also have noticed the v-for attribute in our li tag. This iterates over the elements of an array (or over the values in an object) and is very similar to ng-repeat in Angular.
Finally, you can see the v-on:click.prevent construct in our link. This is like ng-click in Angular but built up in a more general way. The v-on: indicates that an event handler is about to be declared, the click represents the type of event to be handled and the .prevent indicates that this is also to prevent the default action happening. We can also include .stop in a similar way to stop propagation of the event.
Here is the code we need in our ViewModel to make this work:
/*global Vue */
(function () {
    "use strict";
    var computed, data, methods;

    data = {
        availableFlows: [
            {
                "label": "Profile Information",
                "file": "profile-information.xml"
            },
            {
                "label": "New Connection",
                "file": "new-connection.xml"
            }
        ],
        flow: {
            file: "",
            label: "None Selected",
            xml: "No XML loaded"
        }
    };

    methods = {

        /**
         * Update the flow in the model, based on the object passed in
         */
        selectFlow: function (selection) {
            data.flow.label = selection.label;
            data.flow.file = selection.file;
        }
    };

    computed = {
    };

    return new Vue({
        el: "body",
        data: data,
        methods: methods,
        computed: computed
    });

}());
The flow object within data contains the label we are displaying as the journey name (initially set to “None Selected”), and the availableFlows array is what gets iterated over by the v-for in our View.
Finally, we have added a selectFlow function (which gets triggered by the v-on:click) which updates the label and filename in the flow object. The two way binding provided by Vue.js means that this will then change the journey name being displayed.
CujoJs
The example so far demonstrates the principle, but isn’t very useful. Since we have hardcoded the dropdown options into our ViewModel, what benefit does that bring? It’s only really useful when we start adding some dynamic behaviour.
Let’s suppose that we can make a REST call to get the list of available flows, rather than hardcoding it. That would give a much more powerful system. However, as I said at the start, Vue.js only gives us the MVVM behaviour — we don’t get all the other Angular goodies. So how do we do the equivalent of $http?
I have chosen to use the CujoJs REST module to achieve this. I like it because it’s a broadly featured module, and because we also get the CujoJs when module with it — which gives us a promises module. So we get $http and $q in one fell swoop.
Our ViewModel now looks like this:
/*global Vue */
var rest;

rest = require("./node_modules/rest/browser.js");

module.exports = (function () {
    "use strict";
    var computed, data, methods;

    data = {
        availableFlows: [],
        flow: {
            file: "",
            label: "None Selected",
            xml: "No XML loaded"
        }
    };

    methods = {

        /**
         * Update the flow in the model, based on the object passed in
         */
        selectFlow: function (selection) {
            data.flow.label = selection.label;
            data.flow.file = selection.file;
        }

    };

    computed = {
    };

    // Load the list of available flows from the server
    rest("flows/index.json").then(function (flows) {
        data.availableFlows = JSON.parse(flows.entity);
    });

    return new Vue({
        el: "body",
        data: data,
        methods: methods,
        computed: computed
    });

}());
We have removed the hardcoded availableFlows value (and initialised it with an empty array) and we have added in the rest call. This returns a promise, so we can chain a then function call which sets the value of availableFlows (in the data object) to the result of the rest call.
We don’t need to change our HTML for this, since the actual elements of the ViewModel haven’t changed — we’ve just changed how part of it is initialised.
You will notice at the top of the code we use require to pull in the rest module. We do this because we don’t have dependency injection. I will return to this later, to explain how require works in a browser.
For this to be useful, we need the dropdown to do something more than just update a label. When we select a flow from the dropdown, we want it to load that flow’s XML file from the server and display it in the browser:

This is a minor change to make, we need to create an element in the page where the content of the file will be displayed:
<textarea rows="25">{_{ flow.xml }}</textarea>
Then we need to add another REST call to our ViewModel to fetch the appropriate file when a dropdown option is selected:
methods = {
    /**
     * Update the flow in the model, based on the object passed in
     */
    selectFlow: function (selection) {
        data.flow.label = selection.label;
        data.flow.file = selection.file;
        rest("flows/" + data.flow.file).then(function (flow) {
            data.flow.xml = flow.entity;
        });
    }
};
Pause for Thought
What we have looked at so far is how we can build MVVM apps using Vue.js and how we can combine it with other modules to get any additional functionality we are after.
This is powerful in itself, and we can take the principles we have discussed here and extend further. Continuing with this example, I have added the ability to switch between tabs and to display popups:

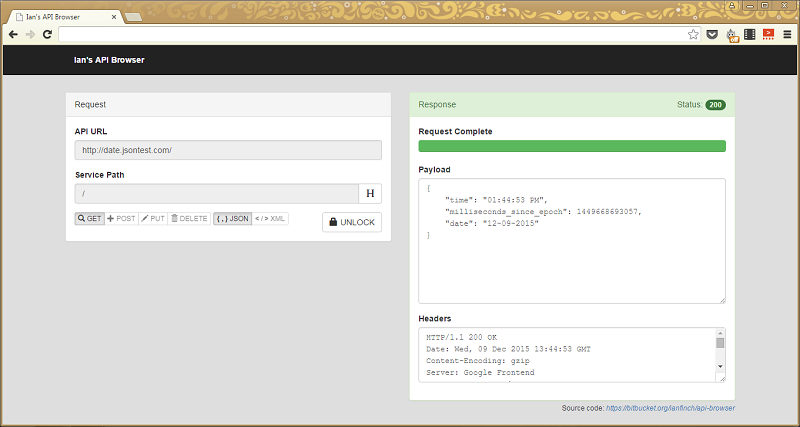
Here is another example built on this tech, this time of a web-based browser for testing RESTful calls:
However, we still have an unanswered question about how the require calls work. And we also haven’t touched on my initial promise of removing gulp. Let’s move on to look at these points.
Webpack
To handle the modular approach (the requires), I turned to webpack webpack.github.io. From its introduction page — webpack is a module bundler, which takes modules with dependencies and generates static assets representing those modules.
In simple terms, this allows us to take a Javascript file which requires other Javascript files (which could in turn require other Javascript files) and generate one single Javascript file out of it that can be used in a web page. Note that webpack can do a lot more than this, but this is the purpose I am using it for here.
Here is an example of it in use:
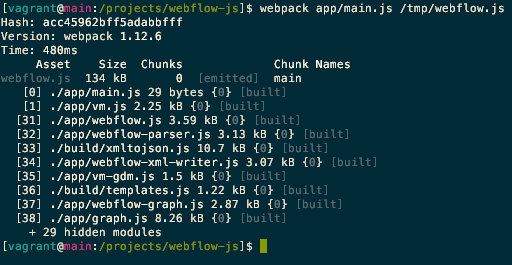
I have asked it to generate a file called /tmp/webflow.js from our file
app/main.js. This then includes the 9 other files listed below it in the
command output — all as a result of require statements we have put in our
code. It also includes 29 other files (the 29 hidden modules from the
output) which are the modules we installed using npm (such as our CujoJs
REST module).
We therefore end up with all our dependencies resolved and have a single
Javascript file (/tmp/webflow.js in this case) which has all the individual
files bundled into it.
What no Gulp?
The last step is to look at building without gulp. When you generate a
package.json file (using npm init), it adds a scripts section and allows you
to specify a test (or puts in a default test if you don’t):
{
  "name": "webflow-js",
  "version": "0.0.1",
  "description": "Webflow visualiser",
  "private": true,
  "main": "main.js",
  "scripts": {
    "test": "echo \"Error: no test specified\" && exit 1",
  },
  "author": "Ian Finch",
  "license": "LicenseRef-LICENSE",
  "dependencies": {
    "rest": "^1.3.1",
    "xmltojson": "^1.1.0"
  },
  "devDependencies": {
  }
}
This scripts section is the key to being able to build without gulp.
Anything which is listed in that structure can be executed using the form npm run <key> — for example we can run the test by typing npm run test. We
can use this approach to run our webpack command from earlier. If we make
the following changes to package.json, we can run webpack by typing npm run pack:
{
  "name": "webflow-js",
  "version": "0.0.1",
  "description": "Webflow visualiser",
  "private": true,
  "main": "main.js",
  "scripts": {
    "test": "echo \"Error: no test specified\" && exit 1",
    "pack": "webpack ./app/main.js ./www/js/webflow.js"
  },
  "author": "Ian Finch",
  "license": "LicenseRef-LICENSE",
  "dependencies": {
    "rest": "^1.3.1",
    "xmltojson": "^1.1.0"
  },
  "devDependencies": {
    "webpack": "^1.12.6"
  }
}
Note that we have added webpack to our dev dependencies. This gives us a
self-contained approach, since we only need to install webpack locally (not
globally across our system) and that happens when we run npm install (because
webpack is in our dev dependencies).
We can add more tasks to our scripts section in the same way. Vue.js
doesn’t support templateUrl like Angular, it only allows templates to be
embedded as strings. To allow me to have separate HTML template files, I have
a small script which looks for HTML template files, converts them to Javascript
and puts them in a templates module which I can then require. I therefore
need a way of running this task to create the templates module. I can do this
by adding a build:templates task to my package.json:
{
  "name": "webflow-js",
  "version": "0.0.1",
  "description": "Webflow visualiser",
  "private": true,
  "main": "main.js",
  "scripts": {
    "build:templates": "node ./utils/html2js.js",
    "test": "echo \"Error: no test specified\" && exit 1",
    "pack": "webpack ./app/main.js ./www/js/webflow.js"
  },
  "author": "Ian Finch",
  "license": "LicenseRef-LICENSE",
  "dependencies": {
    "rest": "^1.3.1",
    "xmltojson": "^1.1.0"
  },
  "devDependencies": {
    "webpack": "^1.12.6"
  }
}
Although this has made things easier (I can type npm run build:templates), I
don’t really want to have to do that. What I want to do is make this happen
automatically before my webpack step happens. Fortunately, there is a simple
way of achieving this.
Any task I define in package.json can have a pre task associated with it (and a post task too). Since I have a pack task to run webpack, if I define a task called prepack, it will run that task before the pack task. Importantly, if the pre task failes, then the main task is not run — if my template creation task is not successful, npm does not run my webpack task.
My package.json now looks like this:
{
  "name": "webflow-js",
  "version": "0.0.1",
  "description": "Webflow visualiser",
  "private": true,
  "main": "main.js",
  "scripts": {
    "build:templates": "node ./utils/html2js.js",
    "test": "echo \"Error: no test specified\" && exit 1",
    "prepack": "npm run build:templates",
    "pack": "webpack ./app/main.js ./www/js/webflow.js"
  },
  "author": "Ian Finch",
  "license": "LicenseRef-LICENSE",
  "dependencies": {
    "rest": "^1.3.1",
    "xmltojson": "^1.1.0"
  },
  "devDependencies": {
    "webpack": "^1.12.6"
  }
}
I can also use a logical and to combine multiple tasks into one. Again, if the first task fails the second task is not executed (because that’s how logical and expressions work).
In order to build my Javascript, I want to run a Javascript lint (for static code analysis) and a complexity analysis. Then I want to build my javascript (which I do by running my pack command). The following additions to package.json illustrate how that works:
{
  "name": "webflow-js",
  "version": "0.0.1",
  "description": "Webflow visualiser",
  "private": true,
  "main": "main.js",
  "scripts": {
    "lint:js": "jslint ./app/*.js",
    "complexity:js": "./node_modules/jsc/js-complexity-viz.js ./app/*.js",
    "build:templates": "node ./utils/html2js.js",
    "test": "echo \"Error: no test specified\" && exit 1",
    "prepack": "npm run build:templates",
    "pack": "webpack ./app/main.js ./www/js/webflow.js",
    "prebuild:js": "npm run lint:js && npm run complexity:js",
    "build:js": "npm run pack",
  },
  "author": "Ian Finch",
  "license": "LicenseRef-LICENSE",
  "dependencies": {
    "rest": "^1.3.1",
    "xmltojson": "^1.1.0"
  },
  "devDependencies": {
    "webpack": "^1.12.6"
  }
}
Putting this all together - e.g. I have also added less to build my CSS
files, I get a build process which checks my code, converts my templates to
Javascript, patches some files, generates the CSS, and generates two static
assets (a CSS file and a Javascript file), all when I type npm run build.
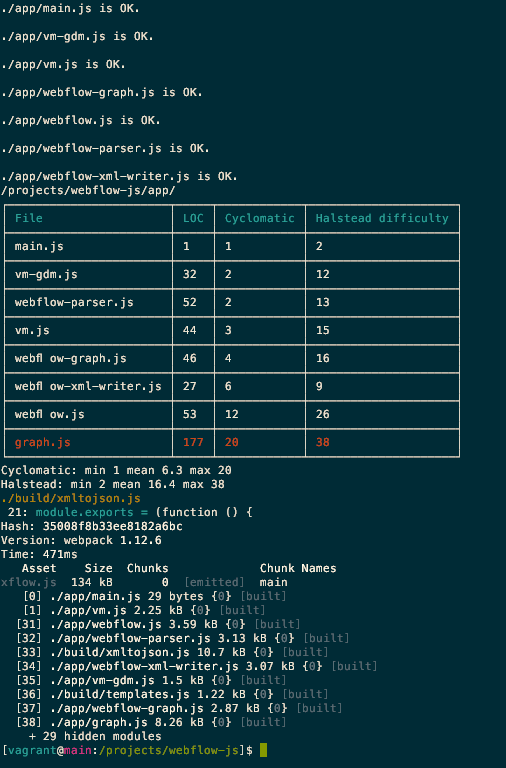
The three broad sections you can see are the results of the linting, the complexity analysis and the webpack process.
I will note that it’s not as well structured as a gulp build process, but it’s one less tool to worry about and at first look seems to cover my use cases (admittedly not tried on an enterprise project yet with a large team).
Summary
So, a brief foray into an even lighter weight Javascript development process. Obviously less opinionated than something like Angular — so may not work as well with larger, distributed teams such as you could find on an enterprise scale project — but seems to show promise as an approach for smaller teams.