Enabling https with Nginx, Docker, and LetsEncrypt
As more and more attention is paid to https (for example, with increasing
levels of warning from Google Chrome on plain http sites), it becomes more
and more important to ensure our websites are protected accordingly.
Fortunately, Let’s Encrypt offers a free way to obtain certificates for our
websites, and works simply with many standard web servers.
This article shows how we can configure Nginx to use Let’s Encrypt to provide certificates, and demonstrates how to automatically update the certificates when they expire. For flexibility, I have also put all the things in containers.
My Nginx Architecture
I discussed Let’s Encrypt in a previous blog
post, where I showed how to use it to
add https to Traefik acting as a proxy for some containerised websites.
This is fine for my public-facing sites, but I also run some smaller sites at
home, which aren’t public. For these sites, I used Nginx as my proxy rather
than Traefik. That gives me an architecture which looks like this:
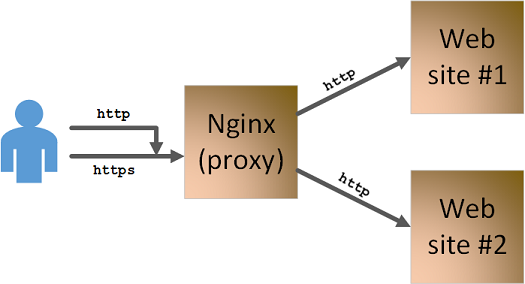
So, I offload ssl at my Nginx proxy, which communicates with my backend
websites over http. At the front, I also redirect http requests to
https, so that all interactions are redirected to secure connections (however
they are initiated).
To complete the picture, I’ll just add that all three components (the proxy and the two webservers) run in Docker containers, and I am hosting them on a Synology NAS (which is where Docker runs).
Adding in Let’s Encrypt
As I mentioned in my previous article,
Let’s Encrypt is a bit of a game changer, since it offers free https
certificates for websites. The restrictions around that, are that you
(obviously) need to prove that you own the website you are requesting a
certificate for, and that the certificates are only valid for 90 days (so you
need a reliable method of automatically updating them, on a fairly frequent
basis).
Let’s Encrypt supports various challenges to prove that you own a domain, and
the one that I am using here is the one where Let’s Encrypt gives you a
random string of characters and you have to put a web page on your site, where
the page name matches that string of characters. Note that this challenge
response has to be served over http, not over https.
Once you succesfully pass the challenge, Let’s Encrypt generates several keys / certificates, which you then need to put in the correct location in Nginx for your configuration.
Fortunately, there are utilities which help with the above process. The tool I
am using in this example is
acme-client. If you
give acme-client appropriate access to your Nginx service, it will
communicate with the Let’s Encrypt service, identify the challenge needed,
update your Nginx server to respond to the challenge, then put all the result
certificates in the correct location.
Adding Let’s Encrypt and acme-client to our diagram, we end up with this:

This is what we need to enable in our Nginx configuration, which we will look at now.
My Nginx Configuration File
My Nginx configuration needs to do four things:
- Offload
httpsin Nginx - Proxy users through to my website containers
- Redirect any
httprequests to thehttpsversion of the page - Allow responses to Let’s Encrypt challenges to be served over
http
Before we get into those details, I start my Nginx configuration with some
general preamble saying what user to run as, where the log file goes, where the
pid gets stored, etc:
user  nginx;
worker_processes  1;

error_log  /var/log/nginx/error.log warn;
pid        /var/run/nginx.pid;

events {
    worker_connections  1024;
}
I then have some http-specific preamble, specifying mime types, stating what the default mime type is, etc:
http {
    include       /etc/nginx/mime.types;
    default_type  application/octet-stream;

    log_format  main  '$remote_addr - $remote_user [$time_local] "$request" '
                      '$status $body_bytes_sent "$http_referer" '
                      '"$http_user_agent" "$http_x_forwarded_for"';

    access_log         /var/log/nginx/access.log main;
    sendfile           on;
    keepalive_timeout  65;
Now we can move on to address some of the requirements from the start of this
section. The next chunk of configuration is for http connections, and does
two things. It starts by handling any requests for URLs starting with
/.well-known/acme-challenge. This is the structure of a URL which Let’s
Encrypt uses for a challenge. We specify that any request of that form is
served from filestore at /var/www/acme.
For any other http request, the second part of this chunk kicks in, and uses
an HTTP 301 redirect to send the user to an https version of the requested
page instead:
    # Non-TLS server
    server {
        listen 80;

        # Allow access to the ACME Challenge for Let's Encrypt
        location ^~ /.well-known/acme-challenge {
            allow all;
            alias /var/www/acme;
        }

        # SSL redirect
        location / {
            return 301 https://$host$request_uri;
        }
    }
That ticks off two of our four requirements. The next chunk handles the other
two requirements (https offload, and proxying). It starts by specifying
where to find the SSL certificates (in a domain-specific directory under
/etc/nginx/ssl), then specifies the proxy location as an (http) URL:
    # Main website
    server {
        listen 443 ssl;
        server_name example.com;

        ssl on;
        ssl_certificate      /etc/nginx/ssl/example.com/cert.pem;
        ssl_certificate_key  /etc/nginx/ssl/private/example.com/privkey.pem;

        location / {
            proxy_pass http://website;
        }
    }
For completeness, here is the configuration for the second website, which is structured in the same way:
    # Second website
    server {
        listen 443 ssl;
        server_name site2.example.com;

        ssl on;
        ssl_certificate      /etc/nginx/ssl/site2.example.com/cert.pem;
        ssl_certificate_key  /etc/nginx/ssl/private/site2.example.com/privkey.pem;

        location / {
            proxy_pass https://website2;
        }
    }
}
As you can see from the above configuration, the certificates are organised
within /etc/nginx/ssl by URL for each site, and private keys are in a separate
private directory.
Before we go on to look at how to generate these certificates, let’s look at what containers I am using to run the above Architecture.
Running the Containers
Normally, I would use command line tooling to spin up these containers, for robustness and repeatability. However, as I said earlier, I am running this on a home setup using a Synology NAS, so I am just using the provided GUI to manage these containers. Even though I’m not generally a fan of GUIs like this, I have to say that it feels to me like Synology have done a good job. The controls feel pretty straightforward for people not familiar with containers, whilst at the same time they map quite nicely onto the CLI commands. What’s more, they work well with the command line, so if I launch a container from the command line, it appears in the GUI and can be controlled from there.
This is the overview screen:

It gives me a view of what containers I have running, and what system resources they are taking up. Here’s an example with my Nginx container, plus a webserver container. As I have said in a previous article, I like to use a busybox-based web server to keep docker image size down. I’m also using the Alpine version of Nginx to keep that small. So I’ve got 3M of docker images running — I assume the other 700M is needed by Synology to run Docker itself.
This next screen shows me all the Docker images I have locally. It’s the
equivalent to typing docker images on the command line:

Next, we can see what containers are actually instantiated (equivalent to
docker ps -a). It’s similar to the overview, but also gives me the ability
to stop and start them:

From that screen, we can look at the details of any running container. Here is my Nginx container as an example. It gives me access to the container in multiple ways (from stop/start buttons, to being able to open an in-browser terminal). The bottom left hand corner shows the various configurations set up for this container. They can be defined in the GUI when you launch the container (or they are picked up from the command line flags, if that’s how you started it). So, in this case, you can see that I’ve mapped ports 80 and 443 from the container into 7080 and 7443.

Another configuration from that screen is volumes, which lets you map local
volumes into the container (the -v option on the command line). The way I
have arranged my setup, is that I have an nginx folder on my Synology NAS,
and I put all the Nginx configuration, etc in there. I then map various
sub-folders from there into my container. This allows me to have easy access
to the configuration files, whilst keeping it feeling idiomatic for the
Synology NAS. If you check back to the configuration file in the previous
section, you can see how this mapping works with the configuration.

The final configuration setting to look at, is the container links option for
Nginx. This is equivalent to the --link option on the command line. Since
this is deprecated, I assume that Synology will move away from it at some
point, but it works now. I use this, to define a link called website which
provides access to my website container. You can find this in the
configuration file from the previous section, where I used it to define the
target for a proxy_pass.

That example shows one website container, but adding the second is straightforward, so I won’t go into detail here.
We are now at a point where this section and the previous have explained how we achieve the basic running pattern we described at the start:
We can now move on to look at automating the creation of certificates with Let’s Encrypt.
Acme Client
The process for obtaining (or updating) a Let’s Encrypt certificate has a number of steps, but it is basically the following:
- Contact the Let’s Encrypt server to start the process
- The Let’s Encrypt server states the URL where it wants to find the challenge
- Configure our Nginx server to respond to the challenge
- Get the Let’s Encrypt server to make the challenge (and get the response)
- Receive the cerificates from the Let’s Encrypt server
- Add the certificates to our Nginx server
Fortunately, there are a bunch of tools which make this process easier. I’ve
already shown how the traefik proxy
automates this for us. Here we will use the acme-client tool for Nginx.
The acme-client is available within the alpine distro’s package management
system, so is easy to obtain. In line with my dockerise all the things
approach, I want to run acme-client in a container. So I’ll start with a
very simple docker file:
FROM alpine
RUN apk update && apk add acme-client libressl
CMD acme-client
After building the container, a quick test shows it is working:
$ docker run acme-client
usage: acme-client [-beFmnNrsv]
                   [-a agreement]
                   [-C challengedir]
                   [-c certdir]
                   [-f accountkey]
                   [-k domainkey]
                   [-t challenge]
                   domain [altnames...]
We now have two containers (Nginx and acme-client) and therefore we need to
share our directores in such a way that acme-client can take care of
configuring Nginx to respond to the challenge, and also can update the
certificates in Nginx with the ones received from Let’s Encrypt.
The three directories we need to worry about are:
/var/www/acme— for the challenge responses/etc/ssl/acme— to receive the certificates/etc/acme— to receive account management keys
The last one is not used by Nginx, but the other two need to be aligned with the directories we mapped into Nginx in our Synology GUI:
Because we are doing this from the command line, we need the full path to the
directories — we need /volume1/nginx instead of just nginx. This means
that we want to map from /volume1/nginx/acme into /var/www/acme in our
container, and from /volume1/nginx/ssl into /etc/ssl/acme. We can choose
anything for our accounts directory (since it’s not used by Nginx), so I’ve
chosen /volume1/nginx/accounts. This gives us:
docker run -v /volume1/nginx/acme:/var/www/acme  \
           -v /volume1/nginx/ssl:/etc/ssl/acme   \
           -v /volume1/nginx/accounts:/etc/acme  \
           acme-client
We also need to pass in the URL of the agreement we are signing up to, the host we want a certificate for, and I have also set a few flags:
N— create a domain key, if one doesn’t existn— create an account key, if one doesn’t existm— put the domain in the path for the certificatev— verbose output
This gives me the command:
docker run -v /volume1/nginx/acme:/var/www/acme  \
           -v /volume1/nginx/ssl:/etc/ssl/acme   \
           -v /volume1/nginx/accounts:/etc/acme  \
           acme-client                           \
           acme-client -a $agreement -Nnmv $host
I now put this in a shell script, to loop around the domains I am using (and with some additional logging and housekeeping):
#!/bin/sh
echo "$(date --iso-8601=seconds) STARTED $0" >> /volume1/nginx/acme-output.log

# Need a directory for storing private keys
if [[ ! -e /volume1/nginx/ssl/private ]] ; then
    mkdir /volume1/nginx/ssl/private
fi

# The agreement for using letsencrypt
agreement=https://letsencrypt.org/documents/LE-SA-v1.2-November-15-2017.pdf

# Generate keys for each domain
for host in "example.com" "site2.example.com" ; do
    echo "$(date --iso-8601=seconds) PROCESSING $host" >> /volume1/nginx/acme-output.log

    docker run -v /volume1/nginx/acme:/var/www/acme             \
               -v /volume1/nginx/ssl:/etc/ssl/acme              \
               -v /volume1/nginx/accounts:/etc/acme             \
               acme-client                                      \
               acme-client -a $agreement -Nnmv $host            \
               2>&1 | sed "s/^/$(date --iso-8601=seconds) /"    \
               &>> /volume1/nginx/acme-output.log
done

# Clean up
docker rm $(docker ps --filter ancestor=acme-client --all --quiet) > /dev/null
echo "$(date --iso-8601=seconds) FINISHED $0" >> /volume1/nginx/acme-output.log
To generate my certificates and keys, I now just run this shell script. From the log file, I can see it run through the various stages of creating challenges, then obtaining the keys and certificates. When the script completes, I have my new certificates in the appropriate place, working with my Nginx configuration.
2018-11-25T19:48:09+0000 STARTED /volume1/nginx/update-certs.sh
2018-11-25T19:48:09+0000 PROCESSING example.com
2018-11-25T19:48:09+0000 acme-client: /etc/ssl/acme/example.com: creating directory
2018-11-25T19:48:09+0000 acme-client: /etc/ssl/acme/private/example.com: creating directory
2018-11-25T19:48:09+0000 acme-client: /etc/acme/example.com: creating directory
2018-11-25T19:48:09+0000 acme-client: /etc/acme/example.com/privkey.pem: generated RSA account key
2018-11-25T19:48:09+0000 acme-client: /etc/ssl/acme/private/example.com/privkey.pem: generated RSA domain key
2018-11-25T19:48:09+0000 acme-client: https://letsencrypt.org/directory: directories
2018-11-25T19:48:09+0000 acme-client: https://letsencrypt.org/acme/new-reg: new-reg
2018-11-25T19:48:09+0000 acme-client: https://letsencrypt.org/acme/new-authz: req-auth: example.com
2018-11-25T19:48:09+0000 acme-client: /var/www/acme/agKmWBRm_QjVhDdDXaUd28qiWxRVmPmXqP3UyEy_TRQ: created
2018-11-25T19:48:09+0000 acme-client: https://letsencrypt.org/acme/challenge/pwFGqQOv...43652455: challenge
2018-11-25T19:48:09+0000 acme-client: https://letsencrypt.org/acme/challenge/pwFGqQOv...43652455: status
2018-11-25T19:48:09+0000 acme-client: https://letsencrypt.org/acme/new-cert: certificate
2018-11-25T19:48:09+0000 acme-client: http://cert.int-x3.letsencrypt.org/: full chain
2018-11-25T19:48:09+0000 acme-client: /etc/ssl/acme/example.com/chain.pem: created
2018-11-25T19:48:09+0000 acme-client: /etc/ssl/acme/example.com/cert.pem: created
2018-11-25T19:48:09+0000 acme-client: /etc/ssl/acme/example.com/fullchain.pem: created
2018-11-25T19:48:26+0000 PROCESSING site2.example.com
2018-11-25T19:48:26+0000 acme-client: /etc/ssl/acme/site2.example.com: creating directory
2018-11-25T19:48:26+0000 acme-client: /etc/ssl/acme/private/site2.example.com: creating directory
2018-11-25T19:48:26+0000 acme-client: /etc/acme/site2.example.com: creating directory
2018-11-25T19:48:26+0000 acme-client: /etc/ssl/acme/private/site2.example.com/privkey.pem: generated RSA domain key
2018-11-25T19:48:26+0000 acme-client: /etc/acme/site2.example.com/privkey.pem: generated RSA account key
2018-11-25T19:48:26+0000 acme-client: https://letsencrypt.org/directory: directories
2018-11-25T19:48:26+0000 acme-client: https://letsencrypt.org/acme/new-reg: new-reg
2018-11-25T19:48:26+0000 acme-client: https://letsencrypt.org/acme/new-authz: req-auth: site2.example.com
2018-11-25T19:48:26+0000 acme-client: /var/www/acme/Eu8CEtnKwBJOxpyxQ2HGR4OVpNN0B4U4j_FlP0-_f0Q: created
2018-11-25T19:48:26+0000 acme-client: https://letsencrypt.org/acme/challenge/4u6zMi6f...43656748: challenge
2018-11-25T19:48:26+0000 acme-client: https://letsencrypt.org/acme/challenge/4u6zMi6f...43656748: status
2018-11-25T19:48:26+0000 acme-client: https://letsencrypt.org/acme/new-cert: certificate
2018-11-25T19:48:26+0000 acme-client: http://cert.int-x3.letsencrypt.org/: full chain
2018-11-25T19:48:26+0000 acme-client: /etc/ssl/acme/site2.example.com/chain.pem: created
2018-11-25T19:48:26+0000 acme-client: /etc/ssl/acme/site2.example.com/cert.pem: created
2018-11-25T19:48:26+0000 acme-client: /etc/ssl/acme/site2.example.com/fullchain.pem: created
2018-11-25T19:48:46+0000 FINISHED /volume1/nginx/update-certs.sh
This takes us to a state where we have the hosting running, with free https
certificates deployed onto our Nginx proxy.
Scheduling Certificate Renewal
As I stated at the start of this article, the certificates from Let’s Encrypt are only valid for 90 days, so we need an automated task which renews them. Luckily (or by careful planning), the shell script from the previous section will also manage renewals. We could do something clever (like working out when the certificate will expire, and scheduling a job to run then), but I have taken the far simpler approach of running the job every day.
For most systems, I would use something like cron or some other job
scheduler, but my Synology NAS comes with the ability to run a task at
regular intervals. So, I will use that GUI to set up my scheduled renew job.
First, the name of the task:

Now we can set the job to run regularly (I’ve done this at 4am on a daily basis):

Finally, the details of the task itself (the location of the update-certs.sh
script:

Now, every morning at 4am, this script checks to see whether my certificates need renewing (and performs the renewal if needed). I can verify this, by checking the log file, for example here is the output from the run on day 2:
2018-11-26T04:00:02+0000 STARTED /volume1/nginx/update-certs.sh
2018-11-26T04:00:02+0000 PROCESSING example.com
2018-11-26T04:00:02+0000 acme-client: /etc/acme/example.com/privkey.pem: account key exists (not creating)
2018-11-26T04:00:02+0000 acme-client: /etc/ssl/acme/private/example.com/privkey.pem: domain key exists (not creating)
2018-11-26T04:00:02+0000 acme-client: /etc/ssl/acme/example.com/cert.pem: certificate valid: 89 days left
2018-11-26T04:00:04+0000 PROCESSING site2.example.com
2018-11-26T04:00:04+0000 acme-client: /etc/acme/site2.example.com/privkey.pem: account key exists (not creating)
2018-11-26T04:00:04+0000 acme-client: /etc/ssl/acme/private/site2.example.com/privkey.pem: domain key exists (not creating)
2018-11-26T04:00:04+0000 acme-client: /etc/ssl/acme/site2.example.com/cert.pem: certificate valid: 89 days left
2018-11-26T04:00:09+0000 FINISHED /volume1/nginx/update-certs.sh
Summary
This concludes this article. It has shown how to configure Nginx in docker
containers as an https offloading proxy, routing to websites which are
themselves hosted in docker containers. It has shown how to automatically
obtain and renew the certificates for the Nginx proxy. All this has been
demonstrated on a configuration running on a Synology NAS.