Hosting a Website with Netlify and Github
With the ongoing situation of working remotely due to COVID-19, I needed an easy way to work collaboratively on a messaging diagram. Having tried some of the more general tools (virtual whiteboards, screen sharing Visio, etc) and having limited success — have you ever tried to edit a diagram in Visio with 3 or 4 people all making “helpful” comments — I started looking around for something more practical. Having found a Javascript-based solution which I thought could do the trick, I needed to find somewhere to host it. I’d seen a lot of people talking about Netlify, so I decided to give it a try. Here is my experience, which I hope will be helpful to anyone who also wants to use Netlify to host their website.
The Problem
I had been on a few calls during the week, where we needed to work out the necessary messaging between components in the application we were developing. We are all used to using UML-style sequence diagrams, so were using shared whiteboard applications or Visio to draw them out as we were talking. The problem was that the drawing process became a barrier to the discussion.
I thought that there must be a simpler way of doing this, and came across Andrew Brampton’s js-sequence-diagrams, which allows you to use a text-based notation:
Alice->Bob: Hello Bob, how are you?
Note right of Bob: Bob thinks
Bob-->Alice: I am good thanks!
Then you supply this as input to a Javascript application and it generates an SVG file like this:

So, if I could wrap this up in a simple web page, I thought it would give an easy way for our team to work on sequence diagrams.
The Application
Most of what I needed already existed in the Javascript module, so all I needed to do was wrap this in a web page with a text area where someone can edit the text notation for the diagram. Given the simplicity of what I wanted to build, I didn’t use a framework and just created a simple web page.
There were a bunch of dependencies I needed to include in my web page, plus I added my own CSS style file:
<!doctype html>
<html class="no-js" lang="">
    <head>
        <meta charset="utf-8">
        <meta http-equiv="X-UA-Compatible" content="IE=edge">
        <title>Messaging Diagram</title>

        <script src="webfont.js"></script>
        <script src="snap.svg-min.js"></script>
        <script src="underscore-min.js"></script>
        <script src="sequence-diagram-min.js"></script>
        <script src="font-data.js"></script>
        <link href="sequence-diagram-min.css" rel="stylesheet" />
        <link rel="stylesheet" href="style.css" type="text/css" media="screen" />
    </head>
The body was simple too — a text area for editing the source and a DIV to
take the generated SVG for the sequence diagram:
    <body>
        <h1>Messaging Diagram Editor</h1>
        <div id="editor">
            <h2>Source</h2>
            <textarea id="source" rows="20" cols="50"></textarea>
        </div>
        <div id="diagram"></div>
    </body>
</html>
To make it a bit friendler to use, I put the notation for an example diagram in the text area. I also needed to add my own Javascript code to trigger generation of the diagram when the text content changed. So I ended up with this:
    <body>
        <h1>Messaging Diagram Editor</h1>
        <div id="editor">
            <h2>Source</h2>
            <textarea id="source" rows="20" cols="50">
browser -> server: request
server -> server: process
participant database
note over server,database: add DB calls
server --> browser: response
note left of browser: display to user
</textarea>
        </div>
        <div id="diagram"></div>
        <script src="manage-input.js"></script>
    </body>
</html>
The Javascript to manage this was straightforward and taken mostly “as is” from the documentation from the original code repo. The bare bones of the code looks like this:
function updateDiagram() {
    var diagram = document.getElementById("diagram");
    var options = {theme: 'hand'};
    var src = document.getElementById("source").value;

    var d = Diagram.parse(src);
    d.drawSVG('diagram', options);
}
I wrapped this in a try ... catch construct and added some code to allow me
to flag parse errors in the text input by changing the colour of the editor
area:
function updateDiagram() {
    var diagram = document.getElementById("diagram");
    var options = {theme: 'hand'};
    var editor = document.getElementById("editor");
    var src = document.getElementById("source").value;

    if (editor.classList.contains("parse-error")) {
        editor.classList.remove("parse-error");
    }

    try {
        var d = Diagram.parse(src);
        if (diagram.children) {
            [...diagram.children].forEach(child => diagram.removeChild(child));
        }
        d.drawSVG('diagram', options);
    } catch (e) {
        editor.classList.add("parse-error");
        if (e.name !== "ParseError") {
            console.error(e);
        }
    }
}
I then added an event listener to call this function whenever the text input changed, and also made an initial call to generate the diagram based on the example sequence I pre-populated into the text area:
document.getElementById("source").addEventListener("input", updateDiagram);
updateDiagram();
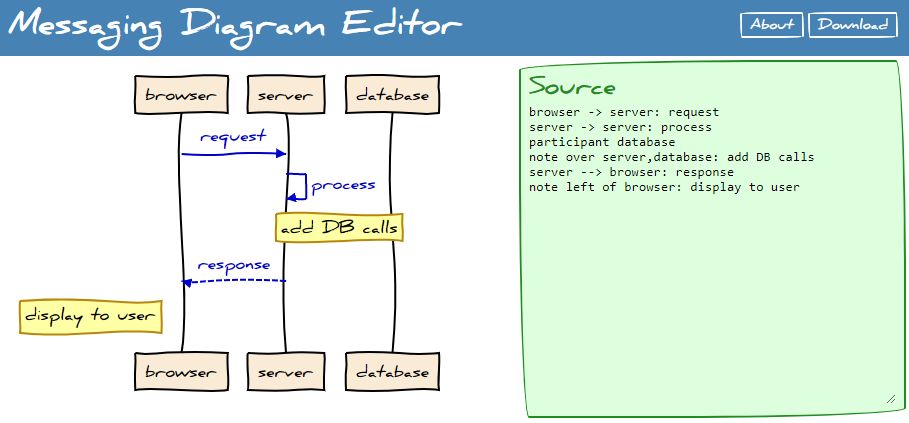
Once I’d added some styling in, it looked like this:
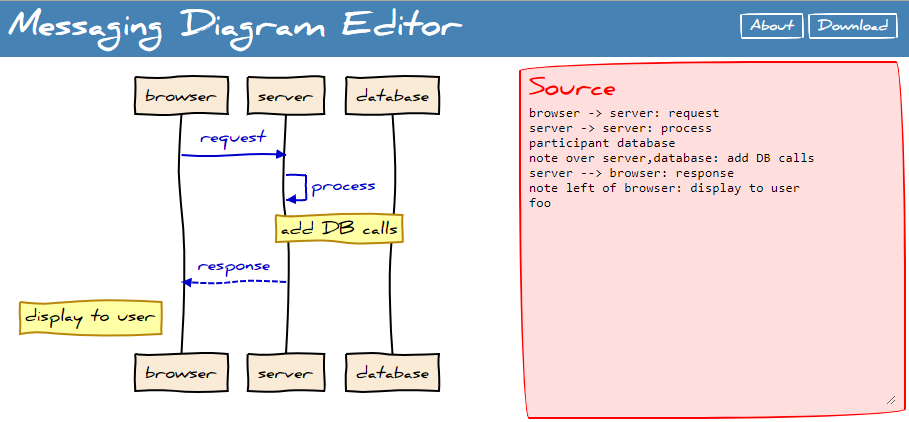
And like this when the text input couldn’t be parsed:
I also added a couple of other small things, like a download button to save the generated image, which I won’t go into here. If you are interested you can find the code in my github repo.
So, now I had an application, I needed somewhere to host it. I’d seen a load of people saying how great Netlify is, so I thought I’d try it out.
The Build Script
The first thing I needed was a build script to automatically create my site.
This was such a simple build, that I thought I would just use bash for this.
First I needed to get clone the library which was providing all the diagramming capability:
#!/bin/bash

git clone https://github.com/bramp/js-sequence-diagrams.git
That repo enabled me to use bower to grab all the dependencies I needed to
include in my index.html:
bower install js-sequence-diagrams
Next I created a public directory and copied my files in there:
mkdir public
cp index.html public/
cp style.css public/
cp manage-input.js public/
And finally I copied the bower dependencies I’d pulled in, together with the
fonts which had been included in the original repo:
cp bower_components/bower-webfontloader/webfont.js public/
cp bower_components/snap.svg/dist/snap.svg-min.js public/
cp bower_components/underscore/underscore-min.js public/
cp bower_components/js-sequence-diagrams/dist/sequence-diagram-min.js public/
cp bower_components/js-sequence-diagrams/dist/sequence-diagram-min.css public/
cp js-sequence-diagrams/fonts/daniel/danielbd.woff public/
cp js-sequence-diagrams/fonts/daniel/danielbd.woff2 public/
Now I had my site and a way to build it, I checked the whole lot into Github and turned my attention to Netlify.
Netlify
I was really impressed with how easy Netlify is to use. A lot of thought seems to have gone into designing the workflow, and it clearly signposts what is needed. You begin by selecting the source for your new site:

Once you have selected the source for your site, you go through an authorisation process to give Netlify access to your repos. You can give access to everything, or just a subset of your repos (which is what I did here):

Then finally, you need to set up the details for the build step. I just needed
to set the command to execute my bash script, and specify the directory which
would contain my web site — public as defined in my build script:

After clicking on Deploy site, the build process is run and you can see that your site has been published. Actually, you can see intermediate steps too, but I wasn’t fast enough to screengrab them.

You can also see a summary of the build:

And you can also look at the log from the build process — very useful if something went wrong:

So, now I have a deployed site and Netlify has generated a URL for it. In my
case, this is elastic-boyd-bc364e.netlify.app. This information was shown on
the main deploy screen, and can also be seen in the settings screen (below).
If I go to that URL, I can see my site is live there.

If I want to change that domain name to something meaningful, there are different options for me to apply a domain name. However, if I’m not worried that my URL is a subdomain of Netlify, I can just click on the Change site name button in the above settings panel and I get the following popup dialogue box which allows me to set up my own subdomain:

This is just scratching the surface of Netlify, and there are a lot of other possibilities. Without going into all these options, it’s worth mentioning a couple of basic capabilities which are immediately useful. The first is that I can set up environmental variables which I can then use in my build script. This is obviously useful to allow configuration changes without having to create new versions or new branches. It looks to be well-structured, for example team-wide variables can be set which can then be overridden on a site by site basis.

Snippet injection is another really useful capability, for example to allow you to add monitoring code to your site:

Summary
My first experience of Netlify has been extremely positive. I managed to go from having an idea, to having a site up a running in almost no time at all. The process was very intuitive and each step was clearly signposted. I can see why people are so enthusiastic about it.
The code from this example is available in my github repo and the app itself is running at messaging-diagram-editor.netlify.app.